Showing posts with label Paint. Show all posts

Tuesday, March 25, 2014

Simple Progressive Watercolors


I have been interested in watercolors for a while now.  I have seen several artists online that do work all in one color of paint.  So I decided to try and create my own version, a very simplified version of course.

Here are all the supplies that you will need if you want to try these yourself:


  • A piece of watercolor paper or another type of canvas meant for watercolors.
  • One large brush for your first few washes.
  • One small brush for the more detailed washes.
  • One color of watercolor paint, or a mixture of different colors if you want to make your own.
  • And finally, water of course!


First start out with a light wash with your large brush.  Let that dry completely before you begin your next wash.


Now, choose a shape or pattern you want to use for the rest of your painting.  Keep it small at first so you can get in a lot of washes, that way you can get your color nice and dark toward the end.  Just create an outline of your shape and paint from the outline to the edge of your paper.  Be sure to let only your first wash show through inside your shape.
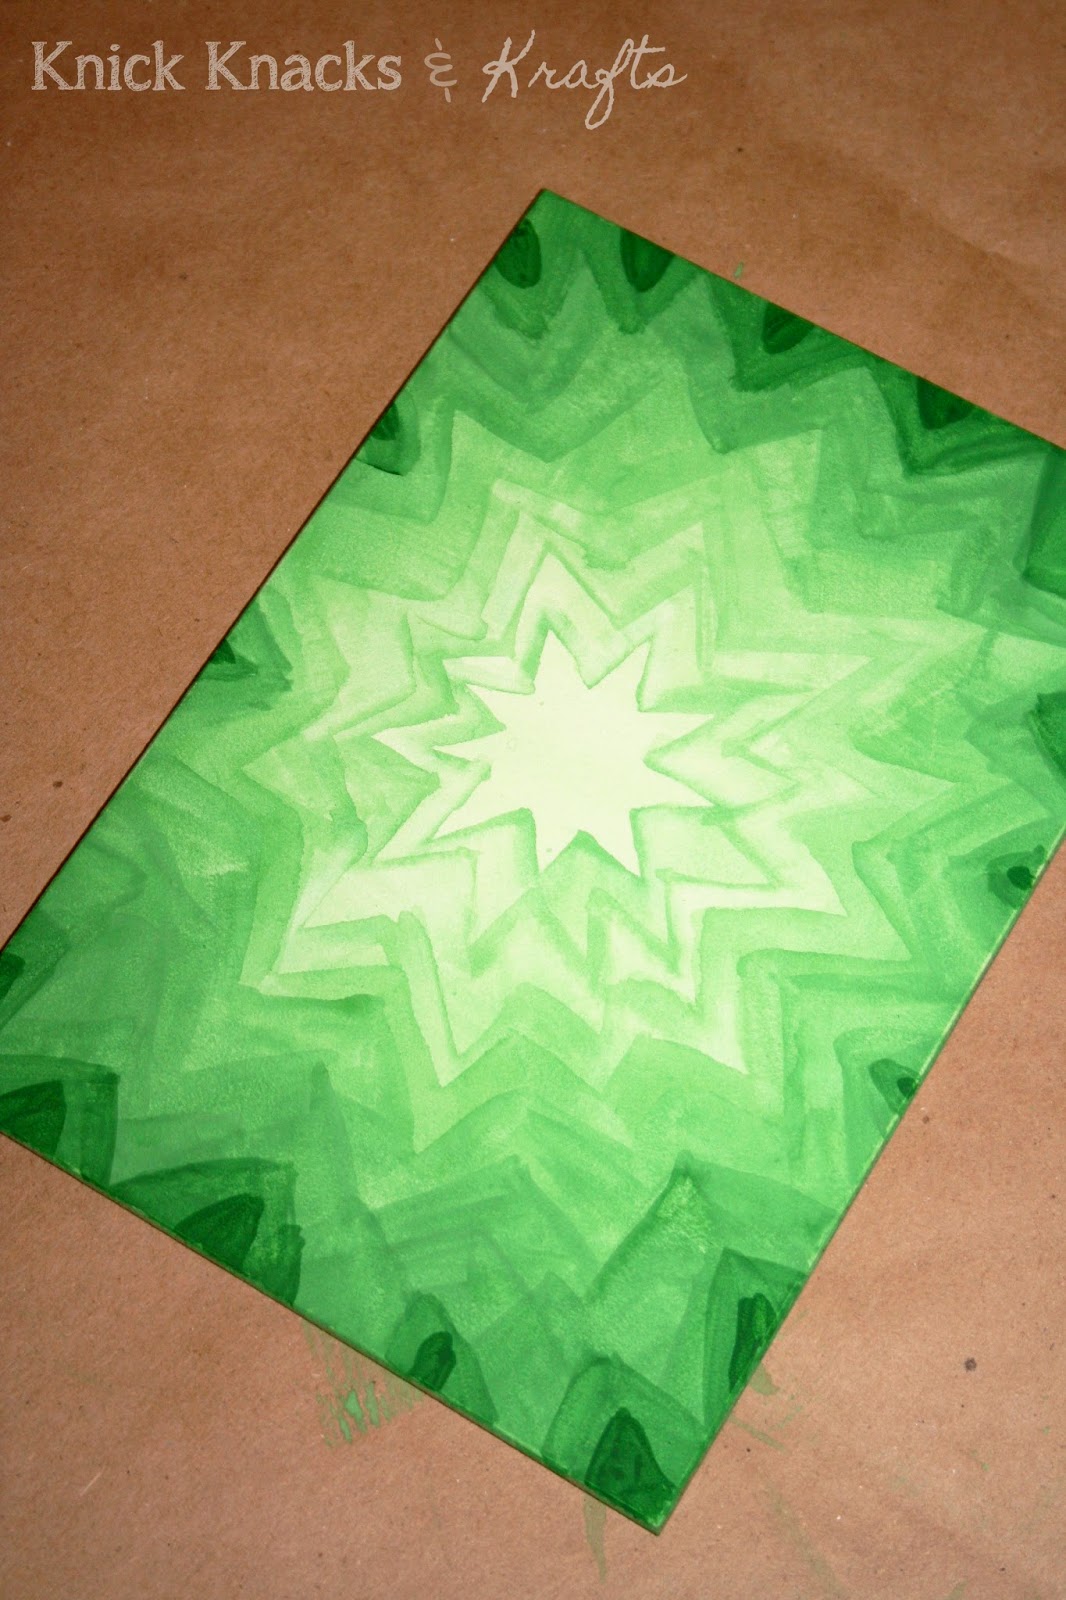

Continue like this until your shape gets all the way to the edge. Just be sure to let each wash dry completely before you start the next one, this project can take some patience. If you are really in a hurry you can try a cool hair dryer, but I don't really recommend it.


Here are a few of the other pieces I have used this technique on.  What do you think? Is this a project you might want to try?  Leave me a comment and let me know how it goes!


Friday, August 2, 2013

DIY Painted Table Runner


I am a frequent and proud visitor of the Walmart clearance aisle. Most of the time there is not much there, but a few weeks ago I found this bamboo table runner which I really liked for only $5.


However, when I got it home it ended up looking kind of dull... so I had the idea to paint a design on it!


I printed off four different flower designs in two different sizes.  Then I cut them out to use as stencils.


When I was positioning them on the runner I was careful to not let the same flowers get too close together.  I also found that it looked best if I let some of the go over the edge.


Then I just painted the flowers in variety of coordinating colors, again being careful to not let the same colors end up next to each other.  I really love how it turned out! What do you think?


Friday, September 28, 2012

Watercolor Pinterest Flop...


It happens to the best of us... Pinterest fails.  It's a fact of life for all Pinterest users.  A while back I came across this pin:

                                                                        Source: alisaburke.blogspot.com via Kristen on Pinterest


The caption was simply: "Watercolor over white crayon."  And I thought to myself, "That's brilliant!"  Don't you agree?  Well it didn't work out so well...

The root of my problem is that whoever originally pinned this pinned the blog homepage and not the blog post... big pet peeve of mine.  Well I searched for a while on the blog trying to find the tutorial, but I didn't have any luck.  The blog is AMAZING! But it has way too many posts for me to look through them all.

But I forged ahead anyway!  I thought it sounds simple and logical, I'll just give it a go anyway...


I taped down my watercolor paper so that it wouldn't wrinkle too badly, and then began drawing a cute twig/vine and leaf design.  I'm usually pretty bad at drawing these kinds of patterns, but I really liked how this one turned out.  I know you probably can't see it very well though... it's white crayon on white paper, there was only so much my camera could do, haha!

Then came the disappointment, I began doing a light wash on my paper and it was quickly obvious that this was not working the way the caption on Pinterest claimed it would.


This is not at all what I was expecting, you can hardly see the pattern at all!  The crayon did repel some of the paint, but not nearly enough.

I am not giving up on this one though.  I plan to try this again sometime because that original pin is just too cute, I want one too!  I think maybe part of my problem is I used watercolor paint from a tube, I think this might work better with the cheap kid's button watercolors.  I think I will try that next, and I will let you all know when I solve the mystery!  If you have any suggestions please share, I'd love to hear them!


Monday, August 27, 2012

Glass Marble Cross

On Wednesday, my best friend and I took a trip to Hobby Lobby in honor of the end of Summer and the new school year.  We were looking around in the aisle with all the wooden frames and such that you can paint. Well I found this wooden cross and had the idea to put some of those flat clear marbles around the center.


I stained the cross portion and then decided it would be better to paint the base.  Next I attached the
marbles with tacky glue.  I had to let them dry for a while with the cross laying down because when I stood it up the marbles started to slid off.  But once it was dry the marbles stayed on just fine.


I used this cool stain marker on this project.  I found it a while ago at Michael's I believe.  Anyway, it has lasted a long time and worked on so many projects, I love it!!  I need to find more of them in other colors, they are soooo much easier than regular stain!


Finally I decided it still looked to plain so I added some paint details.  And Ta-Da!  What do you think?


P.S.  I apologize in advance if my posting is kind of hit and miss for a while... the semester is starting to get into full swing and I will unfortunately be busy with homework a lot in the near future.  It is my last semester so things will be busy, however I will still do my best to keep up with you all in the blogging world!

Saturday, August 18, 2012

Coat Rack Re-vamp


A long while ago, my mom gave me this old accordion style coat rack.  It is quite rickety, so I used to use it to keep my necklaces on.  I just recently took it from my room at home in my parents house to my dorm room. But it didn't quite fit in here, because this is what it used to look like:


Cute, but kind of boring, right?  Well it is amazing what a coat of paint can do!! I had some leftover turquoise paint from a bookshelf I painted awhile back, and it was perfect for this project!

Here is the finished product, minus the scarfs from above:


Much better!  I love giving old items a new life, and it was super easy!


Wednesday, August 15, 2012

Vase Paint

Have you seen those tutorials that are floating around about painting glass vases and other containers by pouring acrylic paint in the bottom and swirling it around inside?? Well I really wanted to try it for myself, and boy am I glad I did!


This is my lovely creation!  However, I suck and forgot to take a before picture....

I chose to use a pearly white paint on this one because it already had a frosted finish with a pattern in it, so I wanted to highlight that.  And it definitely worked!  I know its only August, but I think this will make a cute Christmas decoration... picture it: red ribbon, and some holly coming out of it, pretty perfect right??

Well the painting processes was a lot harder than I thought it would be...  I had to use A LOT of paint, like half of my regular sized bottle, and this vase if fairly small.  But I think a big part of that was because this was a strange shape for a vase and I was wanting to cover all of the inside and not just a portion of it.  However, aside from the massive amount of paint it took to be able to maneuver the paint around inside by just rotating it, it wasn't that hard to get the painting done.

The long process came while it was drying.  That excess paint all started to pool in the bottom once I got the whole thing coated, and I had to keep draining it all out back into the bottle.  I ended up having to do this every few hours for a whole day to get rid of enough paint for the bottom to completely dry.  But on the bright side now I have a much more full bottle of paint again to use on future projects!

There are many more variations on this project out there, have you tried any? Please share, I will always appreciate comments, or suggestions for future projects!


Sunday, July 29, 2012

A Girl and Her Glue: Part 2

Well as promised here is my second pinterest project that envolves making designs with glue! I think this one turned out a lot better than the first one, yay!

Here is the original pin that I recreated and added to:


And this is how my version turned out:


When I saw it with just the glue and no color at all, I was really discouraged with it, but the paint made all the difference and now I LOVE it!


Here's all that you will need:

  • Canvas
  • Liquid glue of any kind (again I used tacky glue)
  • Paint and brush
  • Optional: a design of some sort that you want to reproduce
If you want to know an easy way to transfer a printed design onto your canvas check out this post, which actually uses pictures from when I was doing this same project.


Once you have your design drawn or transfered onto your canvas, its time for glue!  Of course, if you want to skip the drawing and go straight for the glue, have at it! There is no wrong way to go about this.

However, after attempting this particular design I found that it is best to go for something with a lot less detail because as the glue dries and settles on the canvas it will spread out and parts of my design kind of became big blobs.  This ended up being okay, but I want to avoid this in the future.  I also noticed this as I was putting the glue on and ended up altering and simplifying the design a lot while I was glueing.


After the glue has completely dried, paint the entire canvas straight over the glue.  The glue will automatically make the paint look different on your design because of the different textures.  If you want, this can be your final step.  I think it looks really cute, but I was feeling adventurous and wanted to add more!

I blended in some light blue strips into my background color to give it more texture.  I love how this turned out on the canvas, but I didn't like how the stripes turned out on the tree.... So I took it yet another step further.


I painted over just the glue in a pearl colored metallic paint, and I love how it gave it a gentle silver look.

Hope you all have fun using glue in this excitingly creative way!


Sunday, July 8, 2012

Lucky To Be In Love!


A while back I saw this project on Pinterest and I finally got to try it for myself!  The original tutorial used white paint and so do a couple others I've seen, so I wanted to see what using a more dramatic color would be like.  I really love how it turned out, and it was really easy, so I thought I would would share!  This is a mixture of the original instructions and some of my own tips from my experimentation.


What you will need:
  • A cheap print of a painting (I picked mine up at Dollar Tree)
  • Letter stickers
  • Paint in the color of your choice (I picked metallic gold to be bold, but you could use white or black to be more simple if you want.)
  • Paint brush
My print came in a frame, so the first thing I had to do was take out the actual picture.  This was way easier said than done because what I didn't notice in store was that the frame was glued to the cardboard to prevent it from being opened.  But never fear! I was able to cut through the glue with a pair of scissors and kept the frame in tact enough to reuse when I was finished.


Next, I simply applied my stickers.  I tried using a straight edge to line them up, but it ended up being easier to just eye ball it.  I think they turned out fairly straight.


Then I added the paint right over the stickers.  The print I was working with was kind of like magazine paper so it was hard to get the paint to cover at first, but two thick coats did the trick.  This made the paper wrinkle a bit, so if you can I recommend looking for something on a better material, like canvas.


Once it was completely covered came the hardest part of the project . . . waiting!  I was so excited to see the finished product it was very difficult to wait to peel off the stickers.  I got a little over zealous and tried peeling them early, and it didn't work at all.  The paint must be completely dry before you take off the letters, or you will mess up the outline of the text.


Finally, I was able to carefully peel off my letters.  Again, for this step as well, it would be more beneficial to have better print material.  Because of the glossy finish on the paper, the paint still had a tendency to peel up with the stickers but I think they still came out okay.  Then I just put it back into the frame the print came in. Viola!


Enjoy!