Showing posts with label Tutorial. Show all posts

Tuesday, March 25, 2014

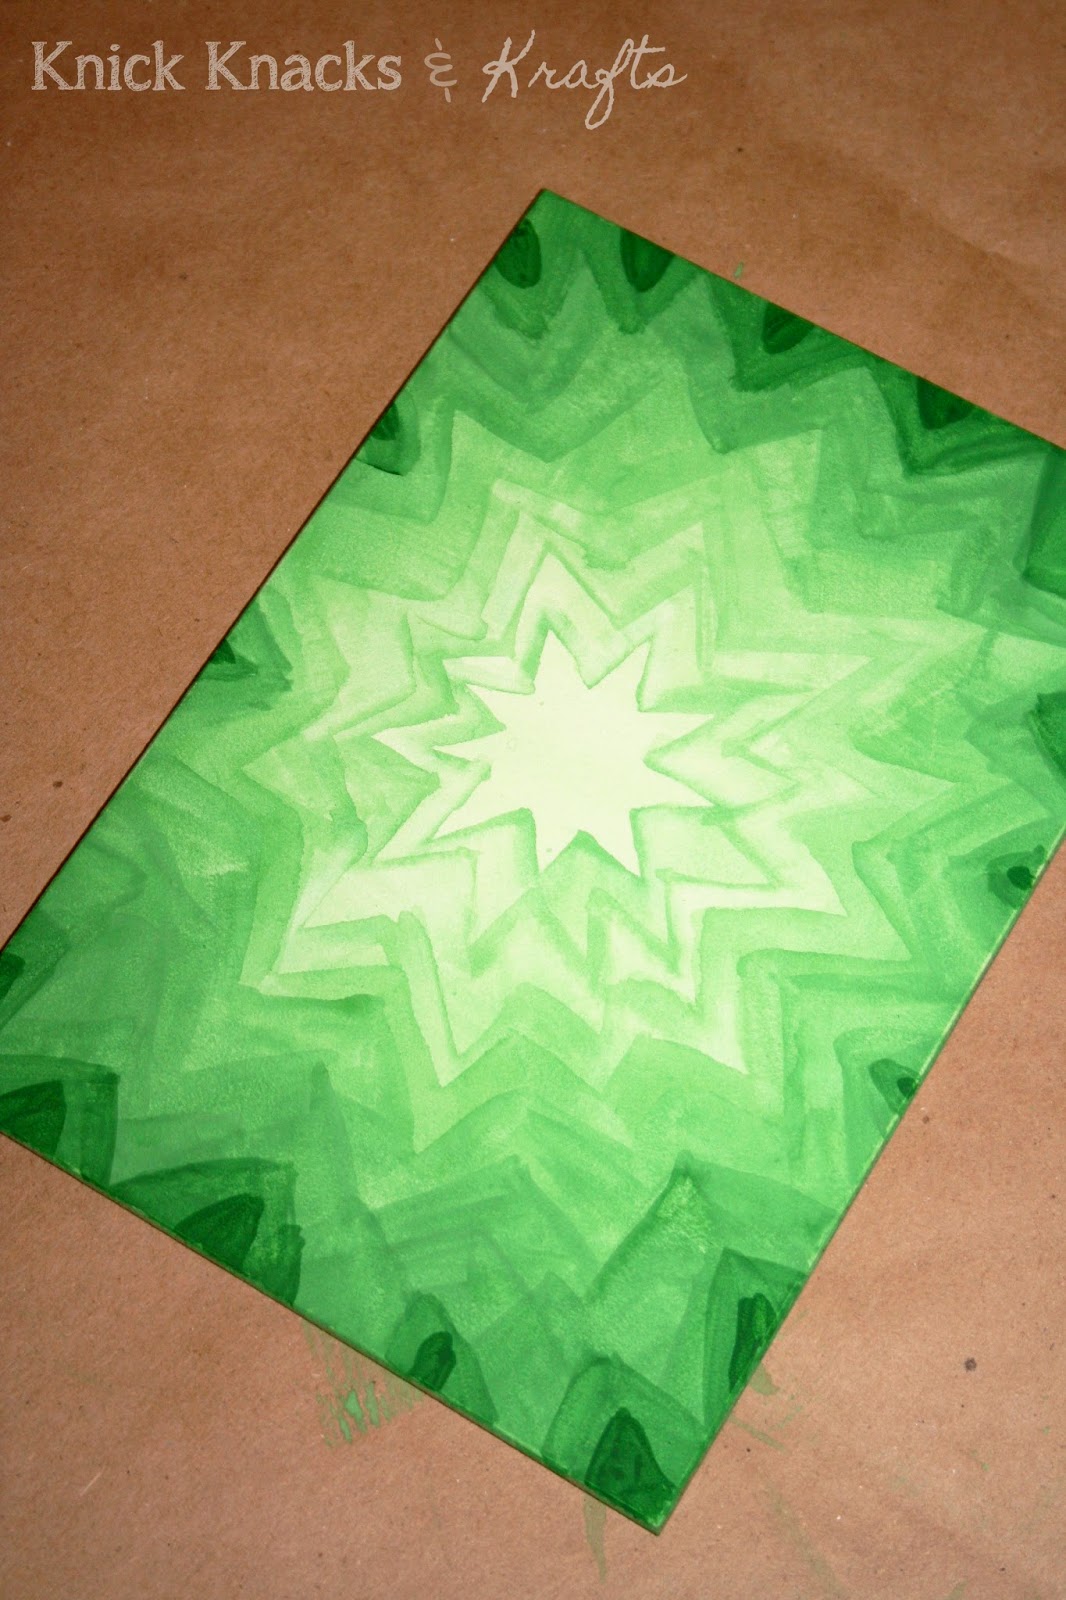
Simple Progressive Watercolors


I have been interested in watercolors for a while now.  I have seen several artists online that do work all in one color of paint.  So I decided to try and create my own version, a very simplified version of course.

Here are all the supplies that you will need if you want to try these yourself:


  • A piece of watercolor paper or another type of canvas meant for watercolors.
  • One large brush for your first few washes.
  • One small brush for the more detailed washes.
  • One color of watercolor paint, or a mixture of different colors if you want to make your own.
  • And finally, water of course!


First start out with a light wash with your large brush.  Let that dry completely before you begin your next wash.


Now, choose a shape or pattern you want to use for the rest of your painting.  Keep it small at first so you can get in a lot of washes, that way you can get your color nice and dark toward the end.  Just create an outline of your shape and paint from the outline to the edge of your paper.  Be sure to let only your first wash show through inside your shape.


Continue like this until your shape gets all the way to the edge. Just be sure to let each wash dry completely before you start the next one, this project can take some patience. If you are really in a hurry you can try a cool hair dryer, but I don't really recommend it.


Here are a few of the other pieces I have used this technique on.  What do you think? Is this a project you might want to try?  Leave me a comment and let me know how it goes!


Friday, August 2, 2013

DIY Painted Table Runner


I am a frequent and proud visitor of the Walmart clearance aisle. Most of the time there is not much there, but a few weeks ago I found this bamboo table runner which I really liked for only $5.


However, when I got it home it ended up looking kind of dull... so I had the idea to paint a design on it!


I printed off four different flower designs in two different sizes.  Then I cut them out to use as stencils.


When I was positioning them on the runner I was careful to not let the same flowers get too close together.  I also found that it looked best if I let some of the go over the edge.


Then I just painted the flowers in variety of coordinating colors, again being careful to not let the same colors end up next to each other.  I really love how it turned out! What do you think?


Friday, August 17, 2012

No-Sew Ribbon Headband


A few months ago I saw some where that you can make your own stretchy headbands with a hair tie, so I thought I would experiment with it and this is what I came up with!


What you will need:

  • Wide ribbon (I used a silky, flexible one, but I'm sure pretty much any ribbon with work)
  • Elastic hair tie
  • Scissors
  • Hot glue gun
  • Small decorative ribbon (optional)


First cut a piece of your ribbon that will go across your head from just below the back of your ears.  I think mine was about 8 inches long.

Then, cut your hair tie (at the seam if it has one) so that it is a straight piece of elastic. Next, attach one end of your hair tie to one end of your ribbon with a bead of hot glue.


Glue and fold over one side of the ribbon, then the same with the other.  This will help the ribbon to fold neatly, and not curl, when you wear it.


Then repeat these steps on the other side of your ribbon and hair tie. If you don't have any decorative ribbon to wrap around the seams then you are finished!

If you do have small riboon, measure how much you will need by wrapping it around the seam between the ribbon and the hair tie and cut it to size leaving a little extra on the end.  Then put a bead of hot glue down the underside of the ribbon and attach it, folding the raw ends under before you glue them down.

Viola! I really love it, and the elastic hair tie helps it not to slip! I think this has to be my favorite blog project yet, what do you think?


Wednesday, August 8, 2012

Zig-Zag Finish

Have you ever been really tight on fabric and not sure you have enough to do a proper hem to finish out your project?  I've definitely been there time and time again... you'd think I'd learn to get extra fabric by now!!

Well just this week I was making a couple curtain panels for my sister's first dorm room.  We were not 100% sure of the exact dimensions of the window so I didn't want to waste a single centimeter!  So, I came up with a solution, I finished the bottom of each panel with a thick decorative stich, instead of a normal hem.


I positioned the needle as close to the bottom edge as I could without risking it slipping or sewing over the edge.


We picked out a thick zig-zag stich, shown above in the diagram on my machine.


When I was finished, the stich was less than a half inch from the edge of the fabric, even at it's tallest points.  I saved a whole inch easily, and I was very pleased!

I did accidentally go over the edge of the fabric at one point, but I was able to undo the messed up section with a seam ripper and continue the stich from the top of a point seamlessly.  So I recommend going slow on this type of finish, definitely worth the extra time!


Then to finish it off I simply cut off the fabric below the stich as close as I could without cutting into the  thread.  This step can be kind of time consuming, but I think the result was well worth the effort.

Give it a try and let me know what you think!


Sunday, August 5, 2012

Flat Iron Hemming

Do you hate having to press a tiny hem with a full size iron? Do you not want to have to invest in a small appliqué iron?  Do you have a flat iron for your hair? Then problem solved!


This is a travel size flat iron (though a full size flat iron would also work) that I now keep with my sewing supplies.  I first tried this out of laziness, but it has turned out to be the best way to press hems that I have ever found!


First I just measure and pin the hems.  I also do both folds at once.  This hem is a half inch, so I folded the fabric in a half inch and then over once more to cover up the raw edge.

Then I simply ran the hot flat iron over the hem.  The great thing about this is that it heats the fabric from both sides at once, so, no matter how thick the fabric, there is never a need to iron twice.  And, there is no need to lug out the ironing board!


Then you can take out the pins and sew up the hem in a breeze, with no need to stop to take out pins along the way!  It's great!


Monday, July 30, 2012

Mmmm Peaches!

Last week I was able to pick some fresh peaches from my friend Annette's backyard.  I knew I wanted to do something fun with them, so on Friday my boyfriend and I made a make shift "dump cake."  Normally with a dump cake you simply dump a can of pie filling into a cake pan, then dump a dry yellow cake mix on top of that, cover it in butter and bake!  Super easy and super yummy!


However, we didn't have the right ingredients to make a traditional pie filling with the peaches so we got creative!  We mixed the freshly cut and pitted peach slices with a little bit of brown sugar and cinnamon.  Plus we added a little bit of citrus juice to keep the peaches from going brown.  We had a lime on hand, so we used that and it worked just fine, but I think I would recommend using lemon.


Next, we put the peach mix into the bottom of our pan (we only had enough to do half the size of what a full dump cake would normally be).  Then we added more brown sugar and drizzled it with about 2 tbsp. of melted butter.


Next came the normal steps of adding the dry cake mix and the pats of butter, which will form the crust.


And VOILA! It was so delicious! The peach "filling" turned out to be really soupy from all the water that baked out of the fruit.

This gave us a new idea... after we ate the crust (couldn't let that yummy goodness go to waste!) and some of the fruit, we added the other half of our cake mix and actually mixed it into the fruit this time. After we baked it, it turned out to be a sort of cake like brownie consistency.  It wasn't exactly pretty but it sure was tasty!

We plan to try and perfect this new idea, so hopefully there will be a sequel to this post in the future!


Sunday, July 29, 2012

A Girl and Her Glue: Part 2

Well as promised here is my second pinterest project that envolves making designs with glue! I think this one turned out a lot better than the first one, yay!

Here is the original pin that I recreated and added to:


And this is how my version turned out:


When I saw it with just the glue and no color at all, I was really discouraged with it, but the paint made all the difference and now I LOVE it!


Here's all that you will need:

  • Canvas
  • Liquid glue of any kind (again I used tacky glue)
  • Paint and brush
  • Optional: a design of some sort that you want to reproduce
If you want to know an easy way to transfer a printed design onto your canvas check out this post, which actually uses pictures from when I was doing this same project.


Once you have your design drawn or transfered onto your canvas, its time for glue!  Of course, if you want to skip the drawing and go straight for the glue, have at it! There is no wrong way to go about this.

However, after attempting this particular design I found that it is best to go for something with a lot less detail because as the glue dries and settles on the canvas it will spread out and parts of my design kind of became big blobs.  This ended up being okay, but I want to avoid this in the future.  I also noticed this as I was putting the glue on and ended up altering and simplifying the design a lot while I was glueing.


After the glue has completely dried, paint the entire canvas straight over the glue.  The glue will automatically make the paint look different on your design because of the different textures.  If you want, this can be your final step.  I think it looks really cute, but I was feeling adventurous and wanted to add more!

I blended in some light blue strips into my background color to give it more texture.  I love how this turned out on the canvas, but I didn't like how the stripes turned out on the tree.... So I took it yet another step further.


I painted over just the glue in a pearl colored metallic paint, and I love how it gave it a gentle silver look.

Hope you all have fun using glue in this excitingly creative way!


A Girl And Her Glue: Part 1

Lately I have seem several art projects on Pinterest that involve glue.  They all looked so cute and easy, so I had to give them a try myself!  Here is the first of two glue projects I have tried:

This is the original pin that I attempted to re-create:


And here is how my version turned out:


I was not sure I liked it at first but it has really started to grow on me and now I am thinking about trying out a new design.


You will need:
  • Liquid glue (I used tacky glue, but I'm sure even white school glue would work)
  • A glue stick
  • Cardboard or some other surface (I used the bottom of an empty case of ramen noodles)
  • pen/marker
  • Paint (black is what I would recommend after trying this out) and brush
  • Paper towel
  • Foil

First draw out a design on your cardboard.  I had to end up glueing a piece of paper over mine cause I messed up my drawing so many times.  But of course you can skip this step and go straight for the glue if you are confident in your free handing skills.


Next, cover your design in your liquid glue.  There is no need to be completely committed to your outlines, as you can see toward the top of my design I altered it a little as I was drawing with the glue.  Make sure that your glue is nice and thick so that it will still be prominent once you put the foil over the top of it.


Then, you have to wait for the glue to dry... and let me tell you it is just like watching a pot boil.  I ended up having to leave mine to dry over night for all of the glue to go clear.

Once it is dry, cover your whole surface with your glue stick and place your foil on top.  I found out the hard way that it is best to rest it on top and mold it around your design instead of laying it taunt and then trying to get it to fit around your glue.


Also, its best for your piece of foil to be larger than your cardboard so that you can fold over the sides and get a good finished look on the edges.


Finally, this was the part I had the hardest time with, painting it.  I found after a few times of messing it up, that it was best to add just a couple drops of water to your paint so its a bit runny.  Then paint one coat over the whole thing and let it sit a couple mins, enough time for some paint to dry but for it to still be very tacking.  Then wipe up the excess paint with a paper towel.  The paint should for the most part stay around the edges and in the creases of your design, otherwise letting the foil show through.

I hope this project inspires you to go get your glue on!  In the next couple days I will be posting another cool glue project to try as well.